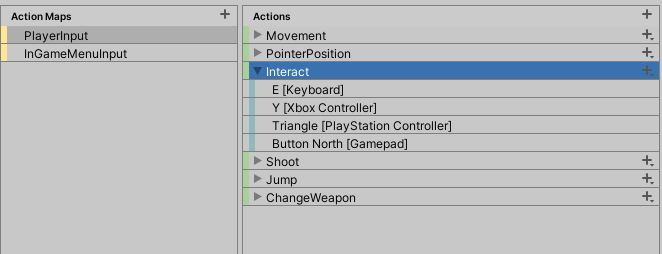
UI changes depending on the controller you are using, with events
I am currently doing a personal project, in which I wanted the UI elements in the scene to change depending on the type of controller being used. In my case, that it detects when it is an XBOX controller, PlayStation 5 and finally, keyboard and mouse.
First of all, I warn that this is my implementation and does not mean that it is the correct one or that it cannot be done otherwise. I accept suggestions and improvements, we are all here to learn.
The new Input System and version 2022.3 LTS will be used, and I have created the following main classes:
- GameManager: Enums are created here for the device type and the action being performed, to display the corresponding icon. In my example case, I use ACTIONS to know if it is an element to pick up, actuate, or talk, for example.
- InputManager: Variables and functions for collecting data from controllers.
- GameEvents: I use this class to create all the events that I am going to call, to have them all sorted in the same place.
And finally the class that will have access to the image or images to be changed. In my case it is:
- InteractableBase: Used as base for all interactables in my game.
GameEvents.cs
public class GameEvents : MonoBehaviour
{
  public static GameEvents instance;

  private void Awake()
  {
    instance = this;
  }

  public event Action onTouchController;
  public void TouchController()
  {
    onTouchController?.Invoke();
  }
}
As you can see, it is a very simple class, and so that it can be seen by everyone, a Singleton has been made. This Singleton can be improved to check if one already exists and that it is not duplicated when going to a new scene where the same one is also present. But for this case, it works for us.
Next, the Action is created (onTouchController), to which the desired elements will have to subscribe, and its function (TouchController), which will notify all the subscribed elements so that the desired code is executed.
GameManager.cs
public enum Actions
{
  INTERACT
};

public enum DeviceNumber
{
  KEYBOARD = 0,
  GAMEPAD_XBOX = 1,
  GAMEPAD_PLAYSTATION = 2,
};

public class GameManager : MonoBehaviour
{
  private static GameManager _instance;

  public DeviceNumber deviceNumber;
  public Sprite noIcon; // Using an image as default icon
  public Sprite[] iconInteract;

  public static GameManager Instance
  {
    get
    {
      if (_instance == null)
      {
        _instance = GameObject.FindObjectOfType<GameManager>();
      }
      return _instance;
    }
  }

  void Awake()
  {
    DontDestroyOnLoad(gameObject);
  }

  public Sprite GetIcon(Actions type)
  {
    int device = (int)GameManager.Instance.deviceNumber;
    Sprite sprite = null;

    switch (type)
    {
      case Actions.INTERACT:
        sprite = iconInteract[device];
        break;
      default:
        sprite = noIcon;
        break;
    }

    return sprite;
  }
}
In this GameManager we will have the enums, that could be public or static in any code file, but I put it here for the readability of the article.
These enums are divided in:
- Actions: used to list the types of actions that will be used to select the type of image.
- DeviceNumber: To choose the image from the actions icon array corresponding to the controller in use.
We will have an image for when there is no icon to try to access (to avoid null reference exceptions), and an array of images for each action.
I show you another way to make a Singleton, this time, in a safer way than with the previous code. If there is not a GameManager created, it is assigned to the _instance variable.
The GetIcon function will be passed by parameter the type of Action to be performed together with the device number, and through a Switch, it will choose the type of sprite that needs to be displayed and return it.
InteractableBase.cs
public class InteractableBase : MonoBehaviour
{
  public Image buttonImage;

  private void OnEnable()
  {
    GameEvents.instance.onTouchController += ChangeIcon;
  }

  private void OnDisable()
  {
    GameEvents.instance.onTouchController -= ChangeIcon;
  }

  void ChangeIcon()
  {
    buttonImage.sprite = GameManager.Instance.GetIcon(Actions.INTERACT);
  }
}
This class will be assigned to the object that we want, in my case, interactable elements in the map.
For all interacting elements I have a base class to be able to amplify it in the future without problems.
Now we are only interested in having an image that changes according to the type of controller that we are playing at that moment.
In the OnEnable and OnDisable functions will be used to subscribe and unsubscribe to the event. These functions are called automatically when you start the game or when you activate them manually (OnEnable), or on the contrary, when you deactivate them manually, change scene or close the game (OnDisable).
It is important that you do not forget to unsubscribe from an event, because if this element no longer exists, it can cause errors that can close the game in an undesired way. Now, all that remains is the InputManager.
InputManager.cs
using UnityEngine.InputSystem;
public class InputManager : MonoBehaviour
{
  void Update()
  {
     UsingDevice();
  }
}

void UsingDevice()
{
  if (Mouse.current.leftButton.wasPressedThisFrame ||
    Mouse.current.rightButton.wasPressedThisFrame ||
    Mouse.current.middleButton.wasPressedThisFrame ||
    Mouse.current.scroll.IsActuated() ||
    Keyboard.current.anyKey.wasPressedThisFrame)
  {
    GameManager.Instance.deviceNumber = DeviceNumber.KEYBOARD;
    GameEvents.instance.TouchController();
  }
  else if (Gamepad.current != null && Gamepad.current.allControls.Count > 0)
  {
    uint count = 0;
    for (int i = 0; i < Gamepad.current.allControls.Count - 1; i++)
    {
      if (Gamepad.current.allControls[i].IsPressed())
      {
        count++;
      }
    }
    if (count > 0)
    {
      if(Gamepad.current is UnityEngine.InputSystem.DualShock.DualShockGamepad)
      {
        GameManager.Instance.deviceNumber = DeviceNumber.GAMEPAD_PLAYSTATION;
      }
      else
      {
        GameManager.Instance.deviceNumber = DeviceNumber.GAMEPAD_XBOX;
      }
      GameEvents.instance.TouchController();
    }
  }
}
In this class, I have to admit that I have seen different ways to see what type of controller is being used, and I am sure there will be better ways, where controlling if the controller is disconnected will pause the game or a message will pop up when a new device is connected.
On the one hand, I check whether any keyboard key has been pressed or any mouse button has been pressed. You could also check if you have moved the mouse in a certain period of time, but I thought it was not so necessary, or at least in my game.
And on the other hand, I check the connected Gamepads. Once verified that there are, I check if any button has been pressed with a local variable called count.
If that variable is greater than 0, I divide the options between XBOX and PLAYSTATION (which are the two types of icons that I want to show).
You can differentiate between the different types of PlayStation, but in my case I don’t care if a PS4 or PS5 controller has been connected, since I will show the icons for the more current console.
And As you can see, at the end of each check the TouchController event is called, causing all objects that are subscribed to that function, to execute.
A short break for the InputManager
Although for the code to work it is NOT necessary to configure the controls in the InputSystem, to interact it would look as above.
InputActionReference interact;

void GetInteractionInputData()
{
   myInteractionClass.InteractedClicked = interact.action.IsPressed();
   myInteractionClass.InteractedReleased = interact.action.WasReleasedThisFrame();
}
In the InputManager, we can have the above code, which assigns to a class two bool called InteractedClicked and InteractedReleased.
Those data that come through interact are from the file that is created when creating a new InputManager controls, as we will see below.
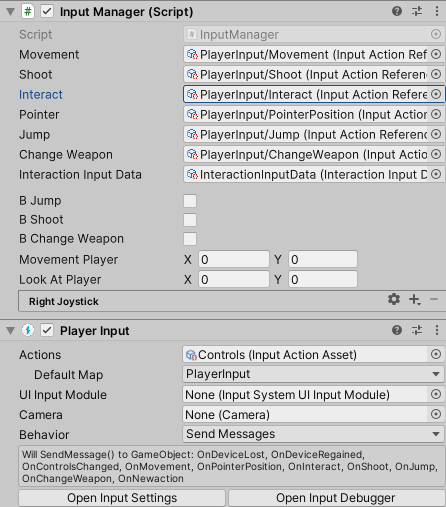
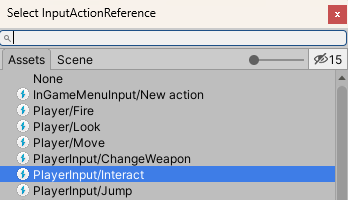
For each Action created in the InputManager, it can be picked up through InputActionReference in code. In the inspector we simply choose the desired action from the list.
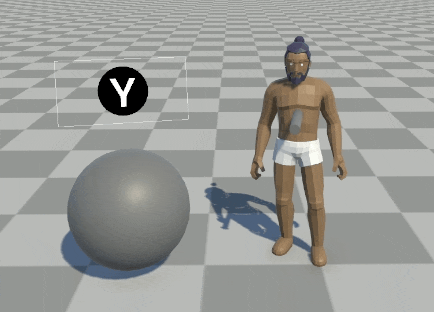
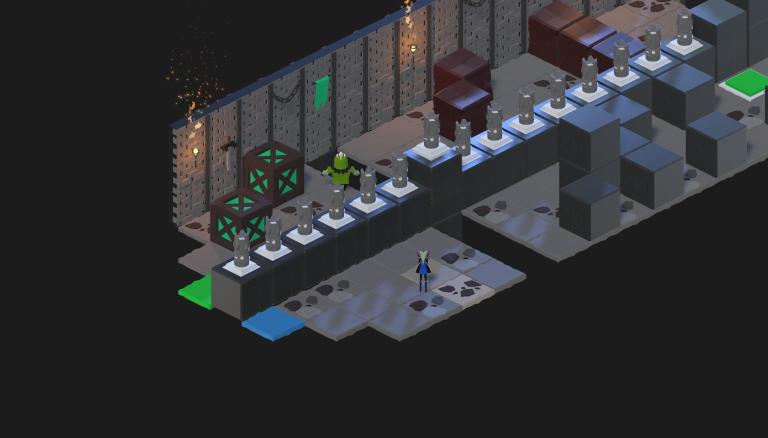
The final result
Once we have done everything, we can go to Unity and assign the corresponding scripts in the inspector (If you have already touched Unity, you should not have any problems), and now you can test that it works correctly.
Remember that in order to see UI in World Position, you must create a Canvas in the object where you want the icon to be seen and assign an image as child, and change the options to be able to place it around the world in the desired position. In my case, since I’m going to use this on top of a few on-screen objects at once, there would be no performance issues, but keep in mind that the more Canvas there is on screen, the worse the game will perform.
So far this little tutorial, if you think it needs some improvement or you have a problem when creating it, do not hesitate to contact me. See you soon!
![Coding a Weather System [PART 1]](https://badwaz.es/wp-content/uploads/2023/09/rain_prob.png)