Creating and saving a mesh for a stylized waterfall generator
Okay, it seems that the title is tremendously specific, but this can be used for things other than waterfalls, but it is true that I made it thinking about it. In this tutorial I will create a CustomEditor to create and delete GameObjects at edit time, save the positions during several seconds of GameObjects to create a mesh joining the points and create and save meshes in the Assets folder of Unity. So, we will learn something.
A small introduction
For my personal project I’m doing, I have several areas with water planned where there will be small waterfalls around the map, and I was thinking about how I would model some of those waterfalls, since I would have to do it by hand in Blender, export it to Unity and see if it fits with what I want. In principle it shouldn’t be a problem, but I wanted to complicate my life and decided that the shape of the waterfall I would do it in Unity directly.
In the end, this can serve you in 2 ways:
- Create a mesh following the environment of the stones / obstacles of a waterfall and then export it to a 3D editor through Unity’s own ExportToFBX tool, in order to retouch the mesh to reduce the amount of polygons or join vertices. Very useful if in the scene you already have the place of that waterfall made and you want the mesh to fit perfectly (or without being waterfalls, any mesh that you want to wrap to a certain type of game objects).
- Create the mesh while the player passes through the area, without saving the mesh in any folder, and once the player leaves that area, delete the mesh. Very useful if you want to save space when exporting a game without those extra meshes, but it will not be as optimized in game as the previous way.
As I have progressed doing it I have realized that… it is quite difficult to do it in a realistic way and that is why the possible improvements have been cut, but maybe in the future, and knowing a little more mathematics, I will expand this generator.
In this first version, you can generate meshes that are saved automatically by assigning them the desired name, you can change the density of triangles (which will be the rows in the generator, you’ll see), how long the positions have to be saved (in case it is a short or long waterfall), in addition to the width. It has only 2 code files and is easily extensible if desired. Let’s go to it.
Setting the scene
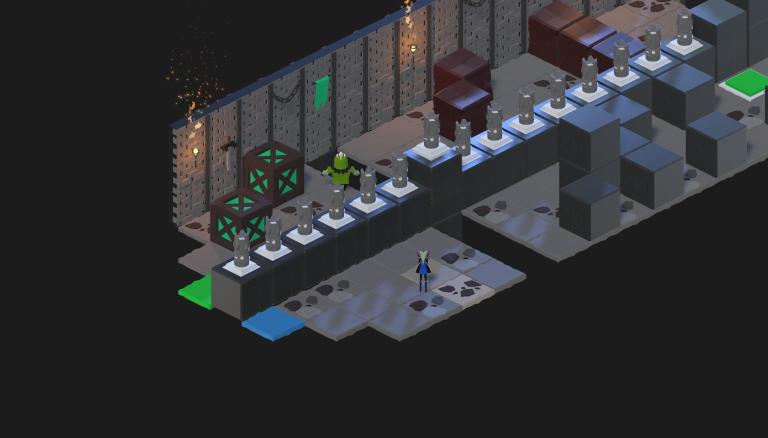
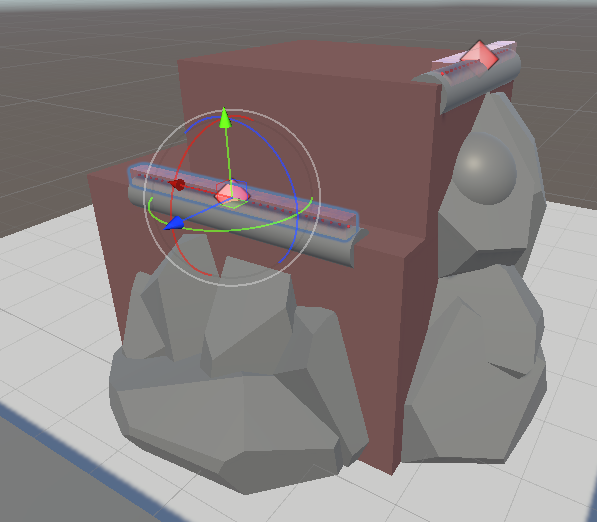
We create a new scenario, with two points where our generator will be placed, trying to imitate a possible scenario in which it could be used in the game.
It is important, when creating new scripts, that we test its operation in different rotations to see if it really works.
The two rectangles are placed at the bottom so that there is a clear limit for each sphere that we will use as vertex, later I will explain the reasons.
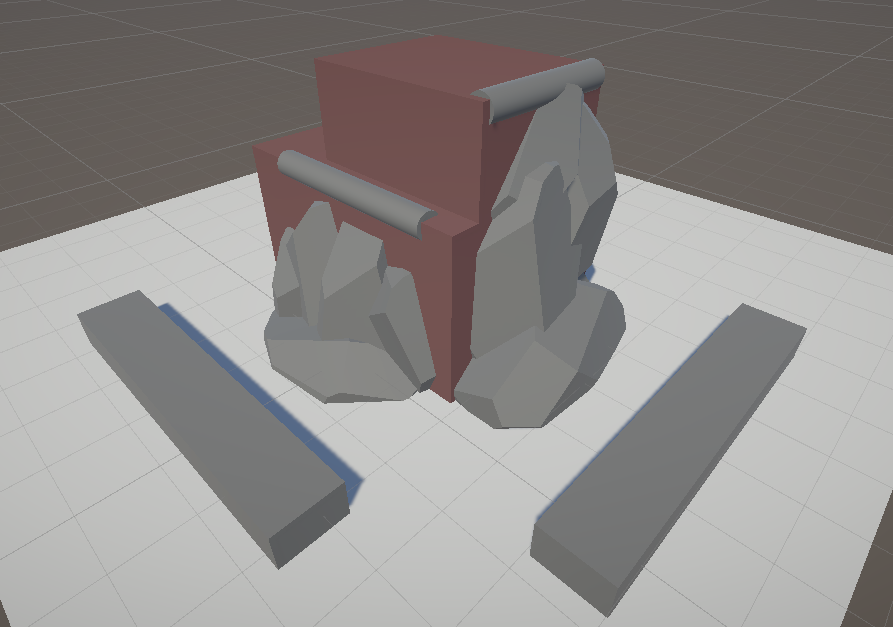
So, what do I want this generator to do?
- Create a kind of box indicating the generator’s occupancy.
- Inside the box, some spheres that will occupy all the space in X of the box, indicating a space between them to decide if more or less vertices are generated.
- When you press “Play”, the spheres that will have Rigidbody, will fall, being able to move ONLY forward or backward, but never to the sides (the reasons why I tell you in the Post Mortem section), making that during the fall, the positions are saved every X time.
- After several seconds or the time you decide, the spheres will disappear, and according to the positions that have been saved during the fall, the mesh will be formed.
And in order to be able to see how the spheres are generated and what position they will have, a part of the generator will be in a script that will be executed at edit time.
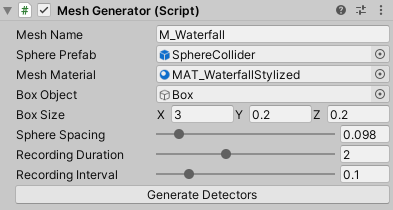
MeshGenerator.cs
public string meshName; // Desired name when saving the mesh
public GameObject spherePrefab; // The sphere with Rigidbody that will spawn
public Material meshMaterial; // Material asigned to the mesh game after creating it

public Vector3 boxSize = new Vector3(1f, 0.2f, 0.2f); // The desired size of the box that we will show.
public GameObject boxObject; // The box that will help us to put the generator

[Range(0.05f, 0.5f)] public float sphereSpacing = 0.2f; // Space between spheres
[Range(0.1f, 5f)] public float recordingDuration = 3f; // Time in seconds of the position recording
[Range(0.02f, 0.5f)] public float recordingInterval = 0.1f; // Indicates how often positions are stored

[HideInInspector] public GameObject[] detectors; // List of generated detectors (spheres)
[HideInInspector] public List<Vector3[]> detectorsPositions;
Rigidbody[] detectorsRigidbody;

bool bIsRecording; // To know when is recording or not
Mesh finalMesh; // To save and process the mesh in different functions
Vector3[] initialPositions; // To know the initial positions of the spheres
The mesh for the sphere that I created has the following parameters:
- Scale: 0.03 in all the axes.
- Added a Rigidbody with a mass of 0.85 and all the rotation constraints frozed.
- In the Sphere Collider, added a custom Physics Material:
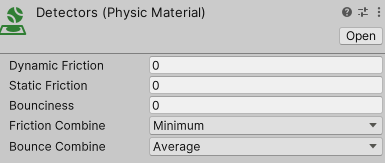
And that is thje prefab for the sphere. The mass of the rigidbody and the custom material depends of what type of result do you want, but this is what worked for me. The more control you have over the spheres, the better end result you will have, with fewer failures.
private void Start()
  {
    detectorsPositions = new List<Vector3[]>();
    initialPositions = new Vector3[detectors.Length];
    bIsRecording = false;
    finalMesh = new Mesh();

    if (detectors.Length > 0)
    {
      detectorsRigidbody = new Rigidbody[detectors.Length];
      for (int i = 0; i < detectors.Length; i++)
      {
        detectorsRigidbody[i] = detectors[i].GetComponent<Rigidbody>();
        initialPositions[i] = detectors[i].GetComponent<Transform>().localPosition;
      }
      StartCoroutine(RecordPositions());
    }
  }
In the Start function we initialize arrays and create the mesh that we will save at the end. As soon as we start, we save the initial positions of the detectors (spheres) and their Rigidbody. You could put everything in the same array and not use 2, but I was more comfortable doing it this way, although it may not be the most optimal.
Finally, when the positions and Rigidbody of the spheres have been saved, we start the RecordPositions Coroutine.
IEnumerator RecordPositions()
  {
    float elapsedTime = 0f;
    bIsRecording = true;

    while (elapsedTime < recordingDuration)
    {
      Vector3[] positions = new Vector3[detectors.Length];
      for (int i = 0; i < detectors.Length; i++)
      {
        positions[i] = detectors[i].transform.position;
      }

      detectorsPositions.Add(positions);
      yield return new WaitForSeconds(recordingInterval);
      elapsedTime += recordingInterval;
    }
    bIsRecording = false;
    CombinePositions();
    ProcessMesh();
  }
We start the timer, and as long as it does not exceed recordingDuration, the positions of the detectors (spheres) will be recorded, and the same function will be called again in a time determined by recordingInterval.
Once this time has elapsed, bIsRecording will be set to false and the functions that process the mesh data can be called. But why use bIsRecording?
void Update()
  {
    if (bIsRecording)
    {
      for (int i = 0; i < detectorsRigidbody.Length; i++)
      {
        Transform child = detectorsRigidbody[i].GetComponent<Transform>();

        // Get the current position of the child object in local space
        Vector3 currentPosition = child.localPosition;

        // Calculate the new position with frozen X coordinate relative to the local            forward direction
        Vector3 localForward = child.parent.TransformDirection(Vector3.forward);
        Vector3 newPosition = child.parent.position + child.parent.rotation * localForward * Vector3.Dot(currentPosition - child.parent.position, localForward);

        // Keep the initial X position
        newPosition.x = initialPositions[i].x;

        // Assign the new position to the child object
        child.localPosition = new Vector3(newPosition.x, currentPosition.y, currentPosition.z);
      }
    }
  }
While testing the mesh generation, I realized that if I rotated the MeshGenerator object, when I started to generate the mesh, the spheres did not move correctly, and this was because the Rigidbody has constraints to decide to which sides it can move and which not, but these constraints only serve in global positions, so for them to work correctly, I had to make these restrictions manually. Therefore, in the Update function, while the positions are being saved in the array, I control that they can not move in the axes that I do not want, in this case, that they do not move in the local position X.
Now, we proceed to the calculation of the triangles in the CombinePositions function:
int vertexCount = detectorsPositions.Count * detectorsPositions[0].Length;

Vector3[] vertices = new Vector3[vertexCount];
int[] triangles = new int[(detectorsPositions.Count - 1) *
                  (detectorsPositions[0].Length - 1) * 6];
int triangleIndex = 0;
int rowSize = detectorsPositions[0].Length;

for (int i = 0; i < detectorsPositions.Count; i++)
{
   for (int j = 0; j < detectorsPositions[0].Length; j++)
   {
     int index = i * rowSize + j;
     vertices[index] = detectorsPositions[i][j];

     if (i < detectorsPositions.Count - 1 && j < detectorsPositions[0].Length - 1)
     {
       int topLeft = index;
       int topRight = index + 1;
       int bottomLeft = index + rowSize;
       int bottomRight = bottomLeft + 1;

       triangles[triangleIndex++] = topLeft;
       triangles[triangleIndex++] = topRight;
       triangles[triangleIndex++] = bottomLeft;

       triangles[triangleIndex++] = topRight;
       triangles[triangleIndex++] = bottomRight;
       triangles[triangleIndex++] = bottomLeft;
     }
   }
 }

finalMesh.vertices = vertices;
finalMesh.triangles = triangles;
We calculate the total number of vertices by multiplying the number of rows by columns of detectorsPositions, and with that we create the vector of vertices and the number of triangles there will be. The size of the array is calculated based on the number of triangles needed. For each quad (a square consisting of four vertices), six indices are required to form two triangles. In the loop, If the current position is not in the last row or last column, it creates two triangles using the indices of the four vertices of the current quad.
The code is generating triangles in a clockwise order. Unity requires triangles to be defined in that way to render them correctly. You can create a mesh generating triangles in counter-clockwise, but Unity will do it in the “good” way internally when executing the code, so is better doing it well, avoiding that Unity makes extra work.
Below is the code needed to calculate the UVs:
Bounds meshBounds = CalculateMeshBounds();

// Assign UV coordinates to the vertices based on local position and mesh bounds
Vector2[] uvs = new Vector2[finalMesh.vertices.Length];
for (int i = 0; i < finalMesh.vertices.Length; i++)
{
  Vector3 localPosition = transform.InverseTransformPoint(finalMesh.vertices[i]);
  Vector2 normalizedUV = new Vector2(
          (localPosition.x - meshBounds.min.x) / meshBounds.size.x,
          (localPosition.y - meshBounds.min.y) / meshBounds.size.y);
  uvs[i] = normalizedUV;
}

finalMesh.uv = uvs;
finalMesh.Optimize();
finalMesh.RecalculateNormals();
finalMesh.RecalculateBounds();
An error that was causing me problems for a long time (too long), was that when assigning the Waterfall material that I had created previously, it was only seen correctly if the mesh was near the World Position (0,0,0), so I made a small shader to show the UVs of the object, making it clear that the problem was that the calculation of the UVs was missing to transform them to Local Position, and this needed to be done while calculating the UVs and when calculating the Bounds of the mesh (as you will see below).
The UVs, in order not to give an error when assigning them to the mesh, you have to keep in mind that Vector2 has to have the same length as the number of vertices of the mesh. Finally, there are some final functions called Optimize (to optimize the mesh), RecalculateNormals and RecalculateBounds so that everything is correct, but the truth is that I have not noticed any change in the final mesh removing these functions, even so, I show you what they are so that you know that they exist.
Bounds CalculateMeshBounds()
{
  Bounds bounds = new Bounds(
  transform.InverseTransformPoint(detectorsPositions[0][0]), Vector3.zero);

  for (int i = 0; i < detectorsPositions.Count; i++)
  {
    Vector3[] positions = detectorsPositions[i];
    for (int j = 0; j < positions.Length; j++)
    {
      Vector3 localPosition = transform.InverseTransformPoint(positions[j]);
      bounds.Encapsulate(localPosition);
    }
  }
  return bounds;
}
Unity brings with it the Bounds class, which represents a bounding box aligned with the axis, which makes things easier in our case. Again, we go position by position going from Global to Local using the InverseTransformPoint function and encapsulate it with Encapsulate.
With this, we would already have all the mesh created and we could use it as we wish. The next step in the Coroutine is to call ProcessMesh:
if (meshName.Length > 1)
{
  GameObject newMesh = new GameObject(meshName);
  newMesh.AddComponent<MeshFilter>().mesh = finalMesh;
  newMesh.AddComponent<MeshRenderer>().material = meshMaterial;
  string assetPath = "Assets/Meshes/" + meshName + ".asset";
  SaveMesh(finalMesh, assetPath);
}
else
{
  Debug.LogError("Not given a name to new mesh in MeshGenerator game object.");
}
This function will save the mesh in the folder that you indicate in the address, but it will also create a new GameObject with that mesh, adding a previously created material. In my case, it is a material which I tell it to be double sided, so that it can be seen from in front or behind the mesh, because of how the mesh can be generated.
private void SaveMesh(Mesh mesh, string assetPath)
{
  Mesh savedMesh = new Mesh();
  savedMesh.name = mesh.name;
  savedMesh.vertices = mesh.vertices;
  savedMesh.triangles = mesh.triangles;
  savedMesh.normals = mesh.normals;
  savedMesh.uv = mesh.uv;

  AssetDatabase.CreateAsset(savedMesh, assetPath);
  AssetDatabase.SaveAssets();
  AssetDatabase.Refresh();

  ClearDetectors();
}
Finally, if we want to save the mesh in the Assets folder, we call the previous function, if you only want InGame to be created and displayed, without creating new meshes in your project, there is no need to create this function.
And finally, the ClearDetectors, AddDetector and UpdateBoxSizeRotation functions. These last two are called from MeshGeneratorEditor.cs.
public void AddDetector(GameObject detector)
{
  if (detectors == null)
    detectors = new GameObject[0];

  Array.Resize(ref detectors, detectors.Length + 1);
  detectors[detectors.Length - 1] = detector;
}

public void ClearDetectors()
{
  if (detectors != null)
  {
    for (int i = 0; i < detectors.Length; i++)
    {
      if (detectors[i] != null)
        DestroyImmediate(detectors[i]);
    }

    detectors = null;
  }
}

public void UpdateBoxSizeRotation()
{
  Quaternion rotation = transform.rotation;
  boxObject.transform.rotation = rotation;
}
The AddDetectors function will be called to create each sphere that will function as a detector, as we will see below. ClearDetectors will be called to remove all the detectors created once the mesh has been created, and UpdateBoxSizeRotation is a function that serves to modify the box that we use as a reference to know the size of our detectors container.
MeshGeneratorEditor.cs
One of the things I wanted to have in the MeshGenerator, was to have a button to be able to see the detectors that were created before going to InGame mode. In order to be able to see the button, a code file had to be created so that it could be displayed inside the MeshGenerator script.
using UnityEngine;
using UnityEditor;

[CustomEditor(typeof(MeshGenerator), true)]
public class MeshGeneratorEditor : Editor
{
  private SerializedProperty meshName;

  private SerializedProperty boxObject;
  private SerializedProperty boxSize;
  private SerializedProperty sphereSpacing;
  private SerializedProperty spherePrefab;

  private SerializedProperty recordingDuration;
  private SerializedProperty recordingInterval;

  private SerializedProperty meshMaterial;
}
When you have to edit how MeshGenerator is displayed in the inspector, you have to add the MeshGenerator.cs variables that you want to display. In the OnEnable method you search the MeshGenerator class for the variables you want, and in OnInspectorGUI, you display them as desired:
private void OnEnable()
{
  meshName = serializedObject.FindProperty("meshName");
  spherePrefab = serializedObject.FindProperty("spherePrefab");
  meshMaterial = serializedObject.FindProperty("meshMaterial");

  boxObject = serializedObject.FindProperty("boxObject");
  boxSize = serializedObject.FindProperty("boxSize");
  sphereSpacing = serializedObject.FindProperty("sphereSpacing");
  recordingDuration = serializedObject.FindProperty("recordingDuration");
  recordingInterval = serializedObject.FindProperty("recordingInterval");
}

public override void OnInspectorGUI()
{
  serializedObject.Update();
  EditorGUILayout.PropertyField(meshName);
  EditorGUILayout.PropertyField(spherePrefab);
  EditorGUILayout.PropertyField(meshMaterial);

  EditorGUILayout.PropertyField(boxObject);
  EditorGUILayout.PropertyField(boxSize);
  EditorGUILayout.PropertyField(sphereSpacing);
  EditorGUILayout.PropertyField(recordingDuration);
  EditorGUILayout.PropertyField(recordingInterval);

  MeshGenerator meshGenerator = (MeshGenerator)target;
  meshGenerator.boxSize.y = 0.2f;
  meshGenerator.boxSize.z = 0.2f;
  meshGenerator.boxObject.transform.localScale = meshGenerator.boxSize;

  serializedObject.ApplyModifiedProperties();

  if (GUILayout.Button("Generate Detectors"))
  {
    GenerateSpheres();
  }
}
In addition, we create the Generate Detectors button, calling the GenerateSpheres function that we will see later. To modify what is inside the scene (in our case, the rotation of the Box), we have to use OnSceneGUI:
private void OnSceneGUI()
{
  MeshGenerator boxRotator = (MeshGenerator)target;

  EditorGUI.BeginChangeCheck();
  Quaternion rotation = Handles.RotationHandle(
              boxRotator.transform.rotation, boxRotator.transform.position);
  if (EditorGUI.EndChangeCheck())
  {
    Undo.RecordObject(boxRotator, "Rotate Box");
    boxRotator.transform.rotation = rotation;

    boxRotator.UpdateBoxSizeRotation();
  }
}
We access the MeshGenerator class, and while we physically rotate the desired object, we call the function we have created in MeshGenerator.cs to update the visual position of the box.
private void GenerateSpheres()
{
  MeshGenerator meshGenerator = (MeshGenerator)target;

  Transform existingContainer = meshGenerator.transform.Find("Detectors");
  if (existingContainer != null)
  {
    DestroyImmediate(existingContainer.gameObject);
  }

  Transform detectorsContainer = new GameObject("Detectors").transform;
  detectorsContainer.parent = meshGenerator.transform;
  detectorsContainer.localPosition = Vector3.zero;
  detectorsContainer.localRotation = Quaternion.identity;

  int numSpheres = Mathf.FloorToInt(meshGenerator.boxSize.x / meshGenerator.sphereSpacing) + 1;

  meshGenerator.ClearDetectors();

  float totalLength = (numSpheres - 1) * meshGenerator.sphereSpacing;
  float startPosition = -totalLength * 0.5f;

  Quaternion rotation = meshGenerator.transform.rotation;
  Vector3 boxPosition = meshGenerator.transform.position;

  for (int i = 0; i < numSpheres; i++)
  {
    float spherePositionX = startPosition + i * meshGenerator.sphereSpacing;
    Vector3 localPosition = new Vector3(spherePositionX, 0f, 0f);
    Vector3 spherePosition = boxPosition + rotation * localPosition;

    GameObject sphere = (GameObject)PrefabUtility.InstantiatePrefab(meshGenerator.spherePrefab);
    sphere.transform.position = spherePosition;
    sphere.transform.rotation = rotation;
    sphere.transform.parent = detectorsContainer;

    meshGenerator.AddDetector(sphere);
  }
}
In this function the following steps are followed:
- We look for the gameObject “Detectors”, if we find it, we destroy it.
- We create the container for the Detectors taking the position and rotation of the parent gameObject.
- The amount of detector spheres is calculated with the size in X of the Box between the spacing you want between spheres. Note that this also depends on the size of the sphere you have.
- Then we call ClearDetectors to delete the previous detectors (if any) and calculate in which position to start creating the spheres, since I do not want to start creating spheres from the center, but from one side.
- Finally, all the spheres are placed in their corresponding position.
The positioning of the spheres has been done thinking about the size in X of the Box, and as it is done, it will not work if the size of the box is enlarged in Z, for example.
Result
Looking at the final results it is clear that if the mesh was made in 3D editing programs such as Blender, you could reduce the amount of triangles that can contain the mesh, and therefore improve the performance of the game.
Post Mortem
Depending on the results you want, this solution to create meshes can be the most effective. You can export the mesh to Blender and modify it to make it more optimized, so you can have the desired shape of the waterfall, adapting it to the terrain.
This solution is also useful for changing terrain, for example, you pass once through that area, an event happens on the stage that modifies the rocks, and you can regenerate again the waterfall to make it look perfectly, saving you those extra meshes and therefore, the final size of the game.
As you see in the GIF above, limits have been placed to make the mesh as straight as possible, although you can always try new settings to see what you like best.
One of the problems when doing this, is that I could not find a good solution to leave those Detectors free without restrictions, since the spheres cross each other, leaving the final mesh a mess (ba dum tss), one of the possible improvements would be that, to get a more realistic way getting a correct mesh even if the vertices cross each other.
Until here the post, for any doubt or suggestion of improvement, do not hesitate to contact me!
![Coding a Weather System [PART 1]](https://badwaz.es/wp-content/uploads/2023/09/rain_prob.png)